Sunday, October 11, 2009

DreamWeaver Crash Error at RunTime

Dreamweaver crashes and unexplained errors


Most of the time, however, the cause is a corrupted cache file called WinFileCache-********.dat or MacFileCache-********.dat inside your personal Dreamweaver configuration folder (the asterisks represent a series of letters and numbers that might differ from computer to computer). The solution is quite simple: close Dreamweaver and delete WinFileCache-********.dat or MacFileCache-********.dat, depending on your operating system.

The location of the personal configuration folder depends on your operating system and version of Dreamweaver. For Dreamweaver CS4, it’s as follows:

* Vista: C:\Users\\AppData\Roaming\Adobe\Dreamweaver CS4\\Configuration
* Windows XP: C:\Documents and Settings\\Application Data\Adobe\Dreamweaver CS4\\Configuration
* Mac OS X: Macintosh HD::Library:Application Support:Adobe:Dreamweaver CS4::Configuration

In all cases, is the name of your user account on the computer and indicates the language of your operating system. The language is usually represented by two pairs of characters separated by an underscore, as in en_US (English), es_ES (Spanish), or fr_FR (French).

Earlier versions of Dreamweaver locate the personal configuration folder in a slightly different location. This is where it can be found in Dreamweaver CS3:

* Vista: C:\Users\\AppData\Roaming\Adobe\Dreamweaver 9\Configuration
* Windows XP: C:\Documents and Settings\\Application Data\Adobe\Dreamweaver 9\Configuration
* Mac OS X: Macintosh HD:Users::Library:Application Support:Adobe:Dreamweaver 9:Configuration

The Dreamweaver configuration folders are hidden on Windows, so you need to enable the option to view hidden files and folders in order to locate them, as follows:

* In Vista, select Start > Computer > Organize > Folder and Search Options > View. In Advanced settings, choose Show hidden files and folders.
* In Windows XP, select Start > My Computer > Tools > Folder Options > View. In Advanced settings, choose Show hidden files and folders.

Once you turn on this option, hidden folders are displayed as dimmed icons to remind you to treat them with care.

Wednesday, September 30, 2009

Antivirus ISSUE

autorun inf virus

I want to tell you a story, two days back i got affected by this virus very badly as it eat up all my empty hard disk space of around 700 MB :( .

I was surprised that my most reliable friend Avast, for the first time failed me in this war against viruses but then again avg and bitdiffender also failed against it. This virus is know popularly as regsvr.exe virus, or as new folder.exe virus and most people identify this one by seeing autorun.inf file on their pen drives, But trend micro identified it as WORM_DELF.FKZ. It is spreading mostly using pen drives as the medium.

New folder.exe virus

Well, so here is the story of how i was able to kill the monster and reclaim my hard disk space.

Manual Process of removal


I prefer manual process simply because it gives me option to learn new things in the process.

So let’s start the process off reclaiming the turf that virus took over from us.

  1. Cut The Supply Line
    1. Search for autorun.inf file. It is a read only file so you will have to change it to normal by right clicking the file , selecting the properties and un-check the read only option
    2. Open the file in notepad and delete everything and save the file.
    3. Now change the file status back to read only mode so that the virus could not get access again.
    4. Autorun
    5. Click start->run and type msconfig and click ok
    6. Go to startup tab look for regsvr and uncheck the option click OK.
    7. Click on Exit without Restart, cause there are still few things we need to do before we can restart the PC.
    8. Now go to control panel -> scheduled tasks, and delete the At1 task listed their.
  2. Open The Gates Of Castle
    1. Click on start -> run and type gpedit.msc and click Ok.
    2. If you are Windows XP Home Edition user you might not have gpedit.msc in that case download and install it from Windows XP Home Edition: gpedit.msc and then follow these steps.
    3. Go to users configuration->Administrative templates->system
    4. Find “prevent access to registry editing tools” and change the option to disable.
    5. Opening the gate of castle: Group Edit Policies
    6. Once you do this you have registry access back.
  3. Launch The Attack At Heart Of Castle
    1. Click on start->run and type regedit and click ok
    2. Go to edit->find and start the search for regsvr.exe,
    3. Launch the attack in the heart of castle: registry search
    4. Delete all the occurrence of regsvr.exe; remember to take a backup before deleting. KEEP IN MIND regsvr32.exe is not to be deleted. Delete regsvr.exe occurrences only.
    5. At one ore two places you will find it after explorer.exe in theses cases only delete the regsvr.exe part and not the whole part. E.g. Shell = “Explorer.exe regsvr.exe” the just delete the regsvr.exe and leave the explorer.exe
  4. Seek And Destroy the enemy soldiers, no one should be left behind
    1. Click on start->search->for files and folders.
    2. Their click all files and folders
    3. Type “*.exe” as filename to search for
    4. Click on ‘when was it modified ‘ option and select the specify date option
    5. Type from date as 1/31/2008 and also type To date as 1/31/2008
    6. Seek and destory enemy soldiers: the search option
    7. Now hit search and wait for all the exe’s to show up.
    8. Once search is over select all the exe files and shift+delete the files, caution must be taken so that you don’t delete the legitimate exe file that you have installed on 31st January.
    9. Also selecting lot of files together might make your computer unresponsive so delete them in small bunches.
    10. Also find and delete regsvr.exe, svchost .exe( notice an extra space between the svchost and .exe)
  5. Time For Celebrations
    1. Now do a cold reboot (ie press the reboot button instead) and you are done.

I hope this information helps you win your own battle against this virus. Soon all antivirus programs will be able to automatically detect and clean this virus. Also i hope Avast finds a way to solve this issues.

As a side note i have found a little back dog( winpatrol ) that used to work perfectly on my old system. It was not their in my new PC, I have installed it again , as I want to stay ahead by forever closing the supply line of these virus. You can download it form Winpatrol website.

Tuesday, March 3, 2009

OUTLOOK ISSUE

sometime outlook problem is very serious.
1) suppose u r not able to remove and edit the rules then it is difficult to manage it.

then if u have best option to delete all rule by just simple command

Start--run--outlook.exe /cleanrules

This command will automatically delete all rules.

Thursday, January 15, 2009

DHCP Server Configuration

This step-by-step article describes how to build and configure a new Windows 2000 DHCP Server in a Windows 2000 Active Directory domain. The Windows 2000 DHCP service provides clients with IP addresses, and information such as the location of their default gateway, DNS servers, and WINS servers.

Installing the DHCP Service

You can install DHCP either during or after the initial installation of Windows 2000 Server or Advanced Server, although there must be a working DNS in the environment. To validate your DNS server, click Start, click Run, type cmd, press ENTER, type ping friendly name of an existing DNS server in your environment, and then press ENTER. An unsuccessful reply generates an "Unknown Host My DNS server name" message.

To install the DHCP Service on an existing Windows 2000 Server:
  1. Click Start, click Settings, and then click Control Panel.
  2. Double-click Add/Remove Programs, and then click Add/Remove Windows Components.
  3. In the Windows Component Wizard, click Networking Services in the Components box, and then click Details.
  4. Click to select the Dynamic Host Configuration Protocol (DHCP) check box if it is not already selected, and then click OK.
  5. In the Windows Components Wizard, click Next to start Windows 2000 Setup. Insert the Windows 2000 Advanced Server CD-ROM into the CD-ROM drive if you are prompted to do so. Setup copies the DHCP server and tool files to your computer.
  6. When Setup is complete, click Finish.

Configuring the DHCP Service

After you install and start the DHCP service, you must create a scope (a range of valid IP addresses that are available for lease to the DHCP clients). Each DHCP server in your environment should have at least one scope that does not overlap with any other DHCP server scope in your environment. In Windows 2000, DHCP servers within an Active Directory domain environment must be authorized to prevent rogue DHCP servers from coming online and authorizing a DHCP Server.

When you install and configure the DHCP service on a domain controller, the server is typically authorized the first time that you add the server to the DHCP console. However, when you install and configure the DHCP service on a member server, you need to authorize the DHCP server.

Note A stand-alone DHCP server cannot be authorized against an existing Windows Active Directory.

To authorize a DHCP server:
  1. Click Start, click Programs, click Administrative Tools, and then click DHCP.

    Note You must be logged on to the server with an account that is a member of the Enterprise Administrators group.
  2. In the console tree of the DHCP snap-in, select the new DHCP server. If there is a red arrow in the bottom-right corner of the server object, the server has not yet been authorized.
  3. Right-click the server, and then click Authorize.
  4. After a few moments, right-click the server again and then click Refresh. The server should display a green arrow in the bottom-right corner to indicate that the server has been authorized.
To create a new scope:
  1. Click Start, click Programs, point to Administrative Tools, and then click DHCP.

    Note In the console tree, select the DHCP server on which you want to create the new DHCP scope.
  2. Right-click the server, and then click New Scope. In the New Scope Wizard, click Next, and then type a name and description for the scope. This can be any name that you choose, but it should be descriptive enough to identify the purpose of the scope on your network. For example, you might use Administration Building Client Addresses.
  3. Type the range of addresses that can be leased as part of this scope, for example, a starting IP address of 192.168.0.1 to an ending address of 192.168.0.200. Because these addresses are given to clients, they should all be valid addresses for your network and not currently in use. If you want to use a different subnet mask, type the new subnet mask. Click Next.
  4. Type any IP addresses that you want to exclude from the range you entered. This includes any addresses that may have already been statically assigned to various computers in your organization. Click Next.
  5. Type the number of days, hours, and minutes before an IP address lease from this scope expires. This determines the length of time that a client can hold a leased address without renewing it. Click Next to select Yes, I want to configure these options now, and then extend the wizard to include settings for the most common DHCP options. Click Next.
  6. Type the IP address for the default gateway that should be used by clients that obtain an IP address from this scope. Click Add to place the default gateway address into the list, and then click Next.

    Note When DNS servers already exist on your network, type your organization's domain name in Parent domain. Type the name of your DNS server, and then click Resolve to ensure that your DHCP server can contact the DNS server and determine its address. Then click Add to include that server in the list of DNS servers that are assigned to the DHCP clients. Click Next.
  7. Click Yes, I want to activate this scope now, to activate the scope and allow clients to obtain leases from it, and then click Next. Click Finish.

Troubleshooting

  • Clients are unable to obtain an IP address
    If a DHCP client does not have a configured IP address, it generally means that the client has not been able to contact a DHCP server. This is either because of a network problem or because the DHCP server is unavailable. If the DHCP server has started and other clients have been able to obtain a valid address, verify that the client has a valid network connection and that all related client hardware devices (including cables and network adapters) are working properly.
  • The DHCP server is unavailable
    When a DHCP server does not provide leased addresses to clients, it is often because the DHCP service has failed to start. If this is the case, the server may not have been authorized to operate on the network. If you were previously able to start the DHCP service, but it has since stopped, use Event Viewer to check the system log for any entries that may explain the cause.

    Note To restart the DHCP service, click Start, click Run, type cmd, and then press ENTER. Type net start dhcpserver, and then press ENTER.

Installation of WSUS 3.0

WSUS 3.0 SP1 delivers important customer-requested management, stability, and performance improvements. Some of the features and improvements include:

* Support for Windows Server 2008.
* Support for SQL Server 2008.
* Enhanced bulk approval capability, preserving existing approvals.
* Support for separate proxy servers and ports for SSL and non-SSL traffic.
* Office Excel report export.


WSUS 3.0 SP1 can be installed alone, or as an upgrade of either WSUS 3.0 RTM or WSUS 2.0 SP1.

This package installs both the WSUS 3.0 SP1 Server and WSUS 3.0 SP1 Administration Console components, for all Windows Server 2003 SP1 supported languages. Additionally, the WSUS 3.0 SP1 client is included in all supported client platform languages. You must install the server components on a computer running Windows Server 2008 or Windows Server 2003 SP1 or later. You may install the Administration Console on a remote computer running Windows Server 2008, Windows Vista, Windows Server 2003 SP1, or Windows XP SP2.

WSUS 3.0 SP1 Server Installation on Windows Small Business Server 2003

If you are installing the WSUS 3.0 SP1 product on Windows Small Business Server 2003, follow the instructions in Installing Windows Server Update Services 3.0 on Windows Small Business Server 2003.


Installation


Install the Report Viewer first

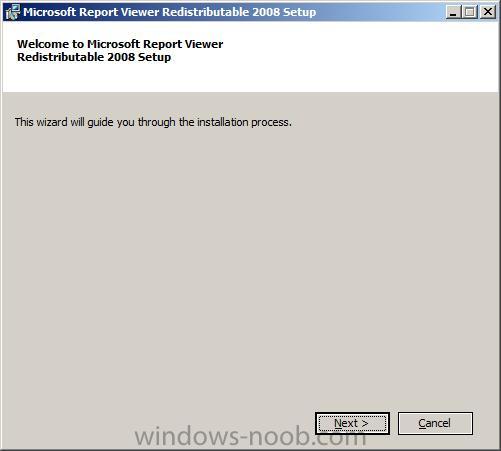
Double-click on the Report viewer exe, choose next to continue at the welcome screen

Attached Image

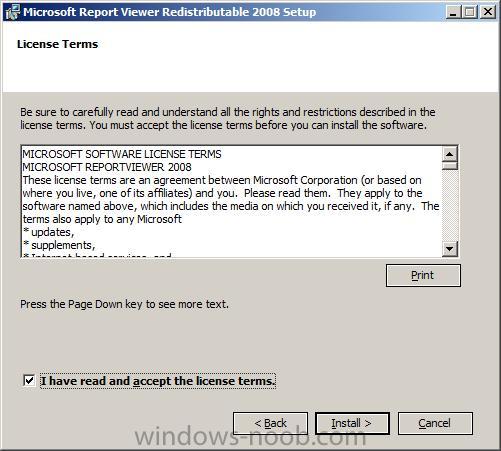
accept the license terms

Attached Image

click Install to install

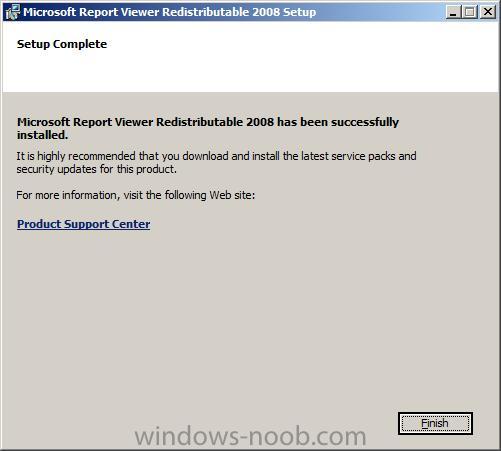
once done click finish.

Attached Image


Install WSUS


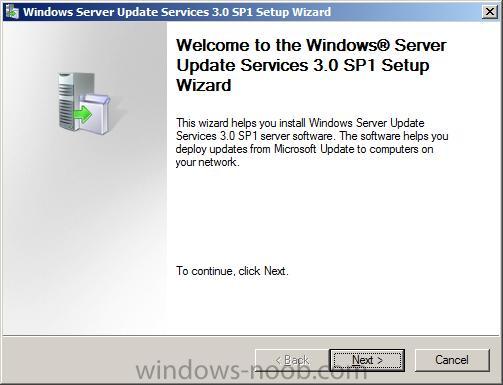
Double click on the WSUS exe, choose next at the welcome screen

Attached Image

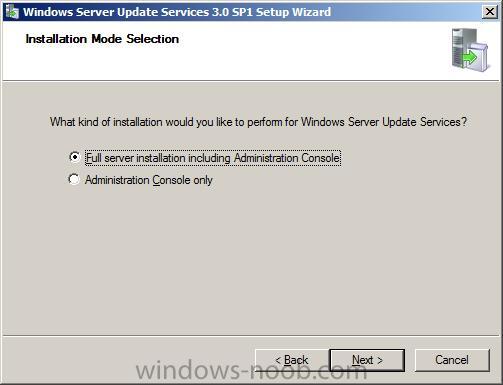
choose the Full Server installation

Attached Image

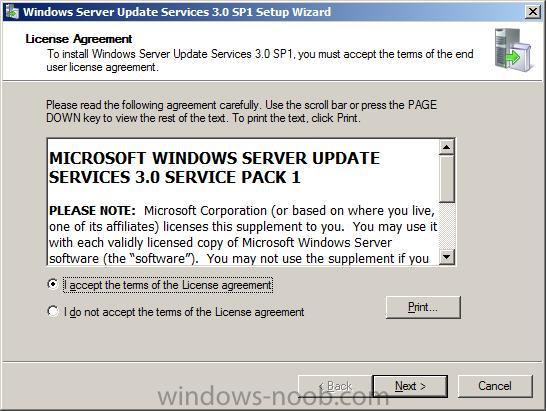
accept the license agreement

Attached Image

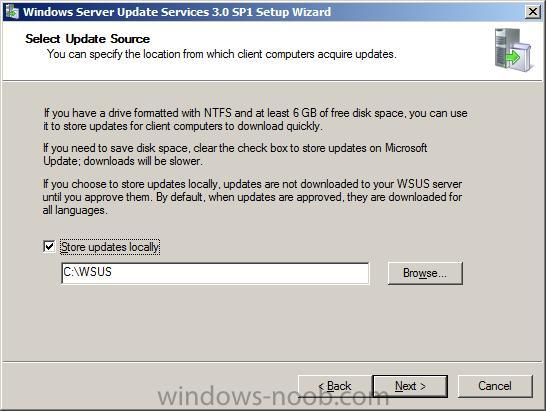
Select your update source (local or on windowsupdate)

Attached Image

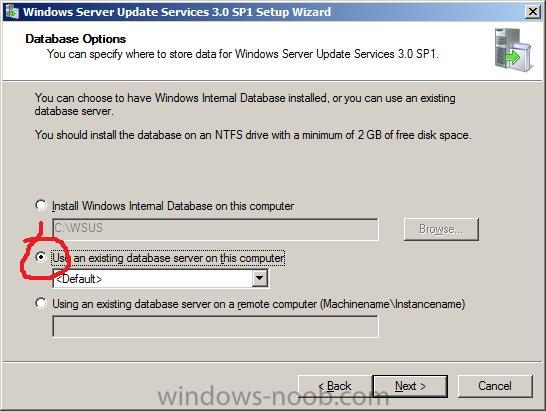
now if you havn't installed SQL 2008 yet, then please do so as the next screen will allow us to pick between an internal windows database (first option) or to connect to our MSSQL database (default) second option.

Choose use existing database as below in the screenshot

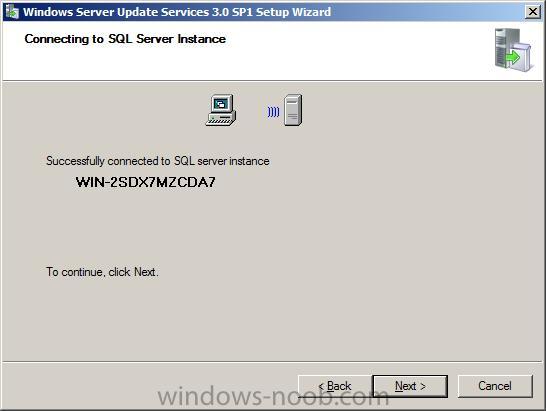
Attached Image

it will hopefully successfully connect to your database, click next to continue

Attached Image

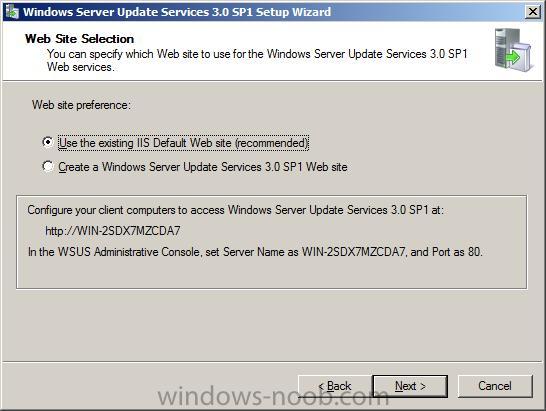
when prompted what IIS website to use, choose the default option (use the existing IIS website)

Attached Image

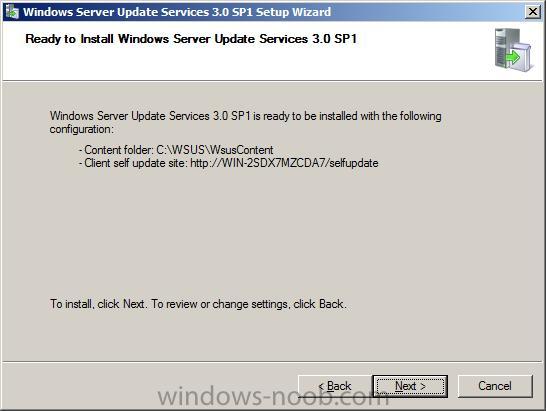
you'll see a summary click next to continue

Attached Image

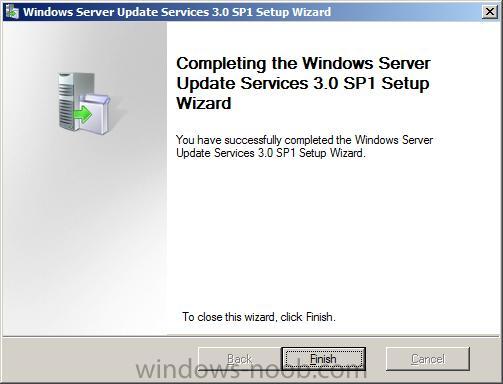
that's it, all done, click Finish.

Attached Image

Saturday, November 1, 2008

IASS.EXE SYSTEM ERROR

whenever you start your PC, sometime you see error iass.exe system error 

this is the unusal services most of the people understand, but this is not unsual services. This services always running backside in the system. So plz take care of this if it is giving error while using your system. This error come due to RAM is not working properly. When you face this problem immediately change your RAM. 

Wednesday, October 22, 2008

Error:---"Reading Text Global Resources... "

Problem in photoshop CS and CS2 have started to act weird. It was working fine before, but now it gets stucks at the splashing screen "Reading Text Global Resources... " every time I start photoshop.

You see, when photoshop is initializing(starting), it loads your preference file located at:

C:\Documents and Settings\user\Application Data\Adobe\Photoshop\8.0\Adobe Photoshop CS Settings

the photoshop preference file is called: Adobe Photoshop CS Prefs.psp


HOW TO FIX THIS PROBLEM: Follow these steps:

1. Make sure your photoshop is not running. (or hanged) you can kill it with windows task manager by hitting control-alt-delete and select the task manager button.

2. find the file called "Adobe Photoshop CS Prefs.psp" in the following folder:

C:\Documents and Settings\user\Application Data\Adobe\Photoshop\8.0\Adobe Photoshop CS Settings\

3. Delete this file or rename it to: Adobe Photoshop CS Prefs-old.psp or whatver you want. The goal is so that photoshop doesnt use this .psp file again when it start.

4. start photoshop, now it should load completely and it will prompt you to customize your color settings. You can click Yes or No.

5. Done

Hope this helps. If you have any comments or questions, you can post them here.